Nav bar Instructions
To make this component work follow these steps:
  1. Remove the delete-this-class class from the navbar13_component div. This will change the positioning of the navbar to fixed.
  2. Add the navbar-on-page class to the page-wrapper class. This will ensure that the navbar is centered on the page.
  3. Add the max-width-full class to the main-wrapper class. This will ensure all sections inside of the main wrapper are full-wdith.
Lasso logo white horizontal
Data Query And downloadsPublicationsIssue TrackerPost-DUC SubmissionFAQsRequest a demo

Issue Tracker

Take me to the Issue Tracker
All Users
Subject Matter Expert (SME)

Submit a ticket to report an issue or ask a question!

If you experience any issues or have questions related to data access, workflow steps, or the use of the Lasso tools across the ABCD and HBCD studies — whether it’s about the associated documentation, or any part of the data access process — please reach out through our issue tracker.  The issue tracker is found through the Help Center link in the menu list located on the left panel.  We encourage you to submit a ticket so we can respond efficiently and route your inquiry to the appropriate expert. Submitting a ticket ensures your issue is properly tracked and addressed by the right Subject Matter Expert (SME). The more details you provide, the faster we can help.
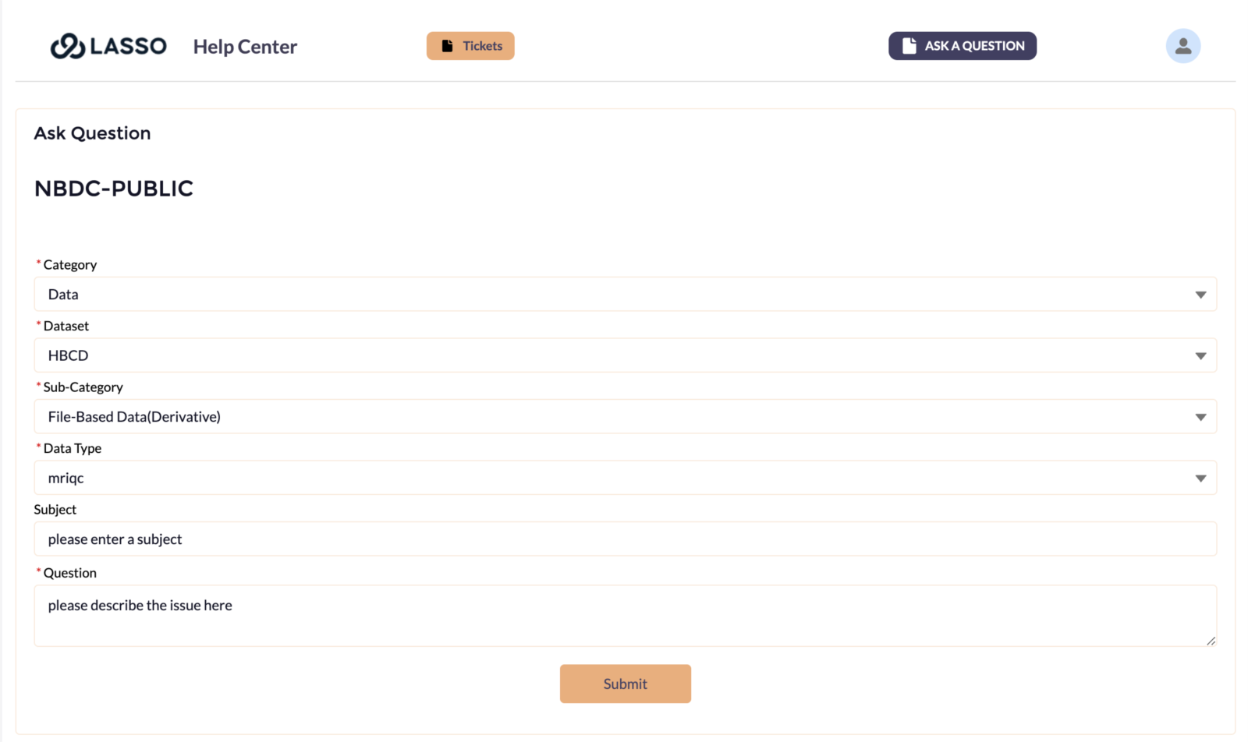
 Please follow the steps below to submit your ticket.

Accessing the Issue Tracker/Ticket system for all users

Ticket Submission Process

  1. Log in: https://nbdc-datashare.lassoinformatics.com/
  1. Access the Help Center
    On the left-hand menu, select Help Center → click Create an Issue.
  1. Fill in details
    Complete all required fields in the ticket for. Please provide clear and specific information about your question or issue.
    You will receive email notifications as your ticket progresses.

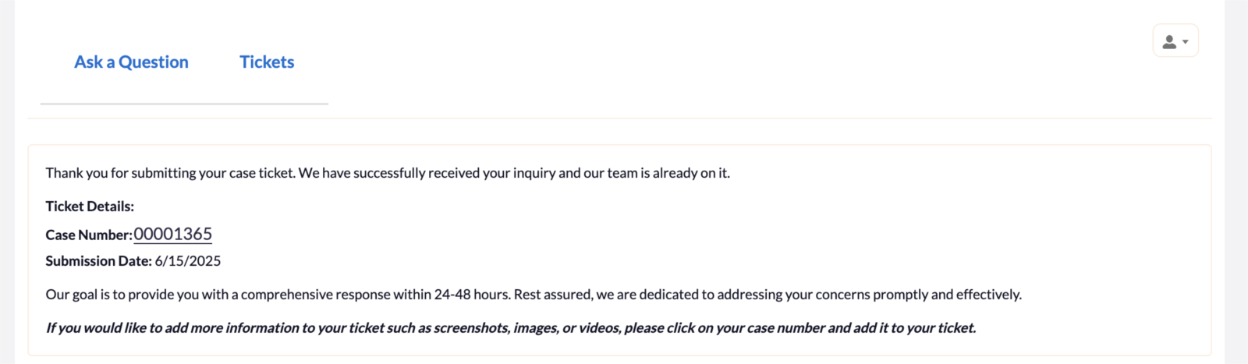
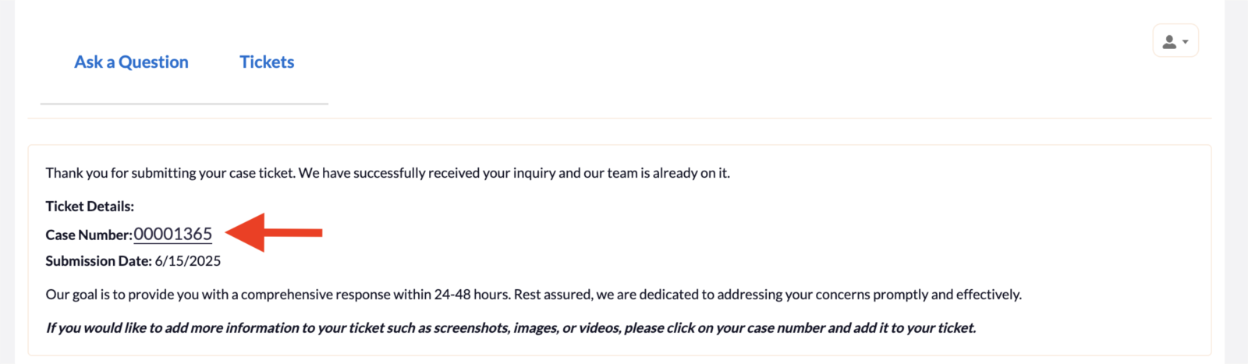
Once a ticket has been submitted, you will be provided with your associated Case Number on the following screen as seen below

An email with the same information will also be sent to you with a link to your open ticket.  

You will receive the email below from “Lasso No Reply” as the sender.

Adding attachments or additional information to a ticket

Once a ticket has been submitted, you can add additional information to the ticket to help get the issue resolved quicker.  

Note: There is a maximum of 10 attachments or 10MB total that can be uploaded to each issue/ticket.

Accessing your ticket

To access your submitted ticket, there are a few methods to review and add information, screenshots, or files to your ticket.  

  1. Accessing the ticket by clicking on “Manage Tickets” button found on the Help Center page in the Lasso Application.
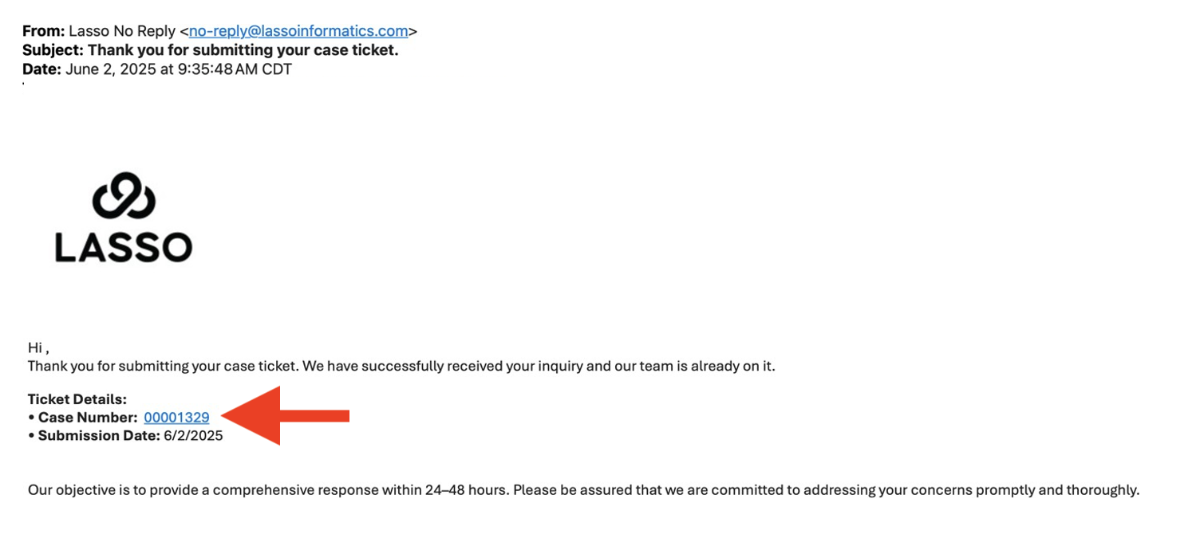
  1. Clicking on the Case Number found in your confirmation email.
  1. Clicking on the Case Number link found on the Confirmation Page.
    ‍Note: the confirmation page is shown only once after you have submitted your ticket for the first time.

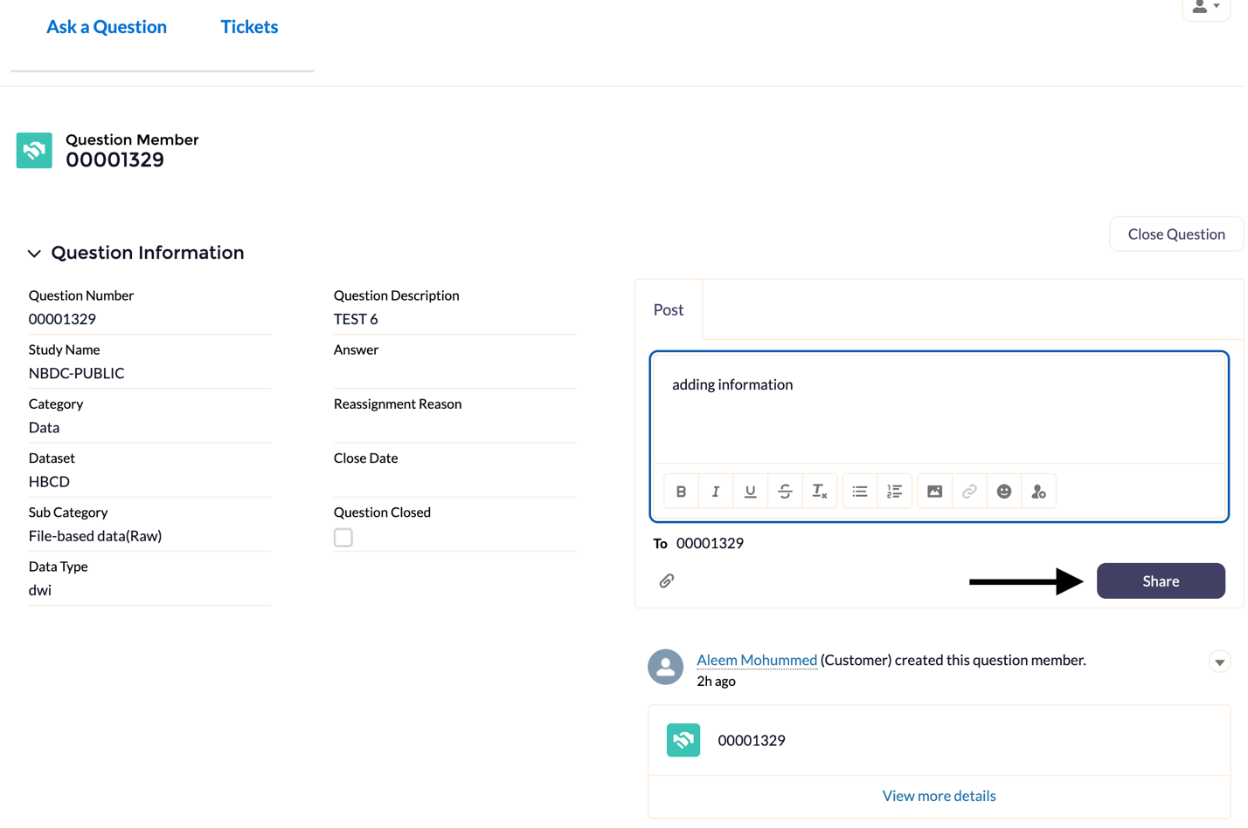
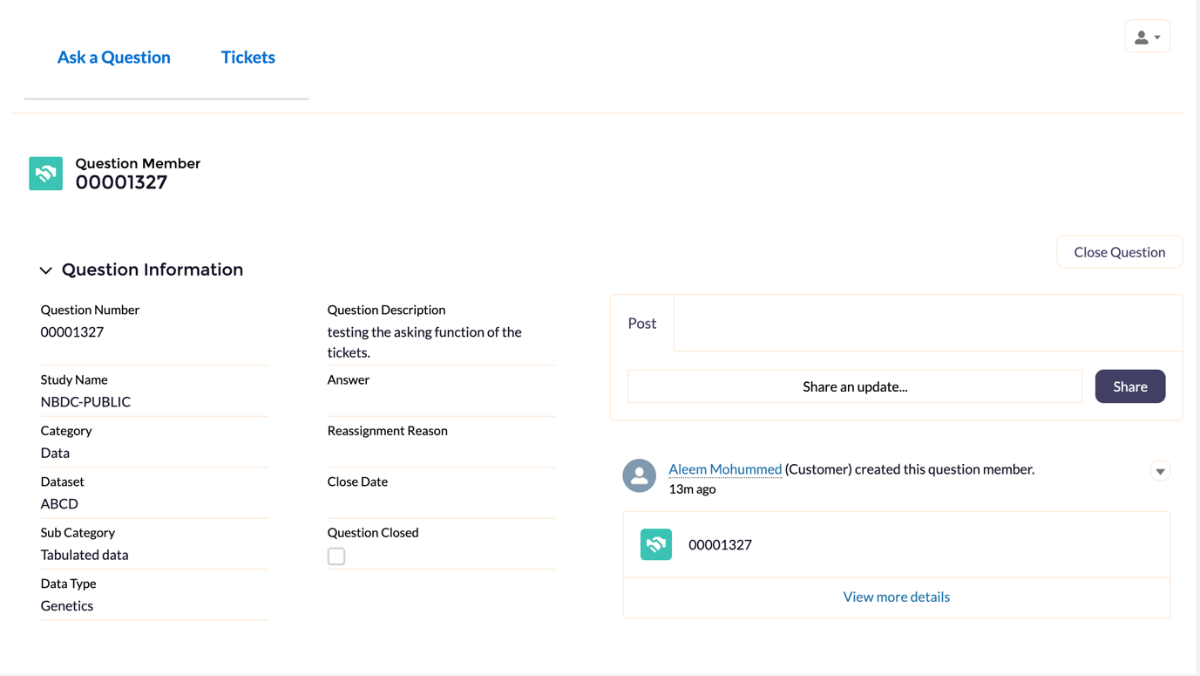
After accessing your ticket through one of the 3 methods listed above, you will be directed to the screen below

Picture 465155508, Picture

‍

  1. To add information to your ticket, click on the “Share an Update” button  
A screenshot of a computerAI-generated content may be incorrect., Picture
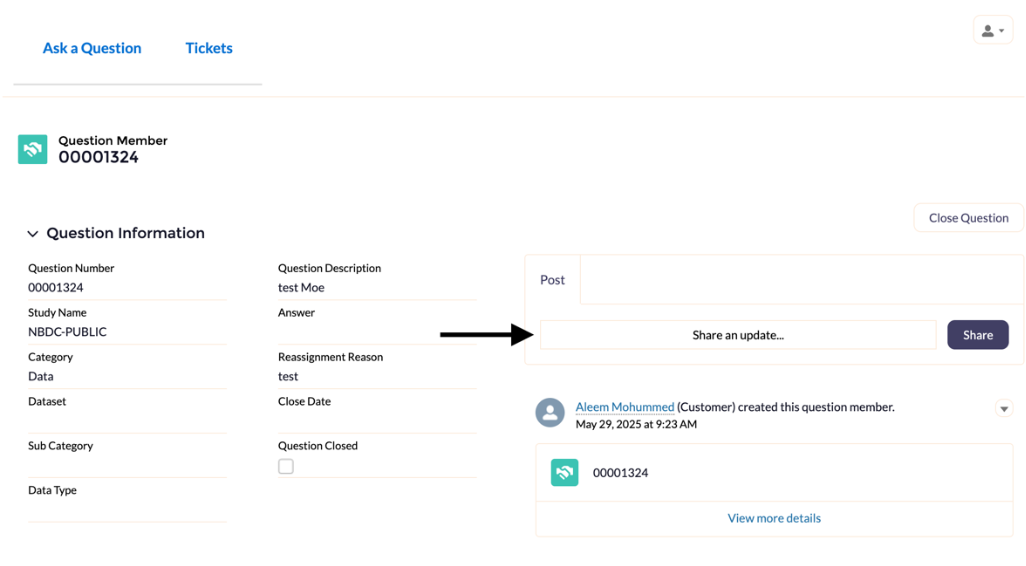
  1. Enter your additional information in the text box which appears after clicking on the “Share an Update” button
Picture 14537698, Picture
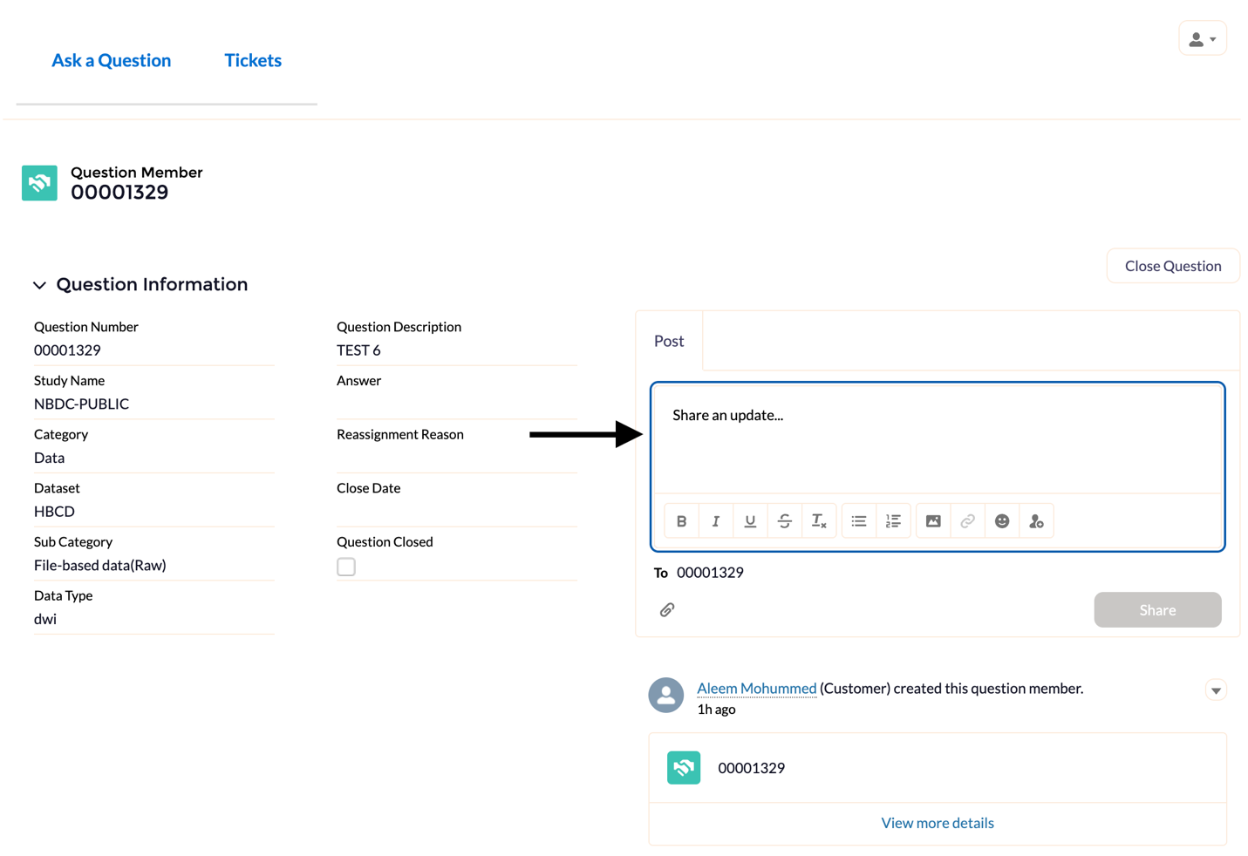
  1. To add an attachment, screenshot, or file – click on the “Paper Clip” icon found at the bottom left side of the text box.
    ‍Note: Only files with the following extensions will be accepted as an attachment – xls, xlsx, csv, doc, docx, pdf, jpeg, png, ppt, pptx

Picture 1072558551, Picture
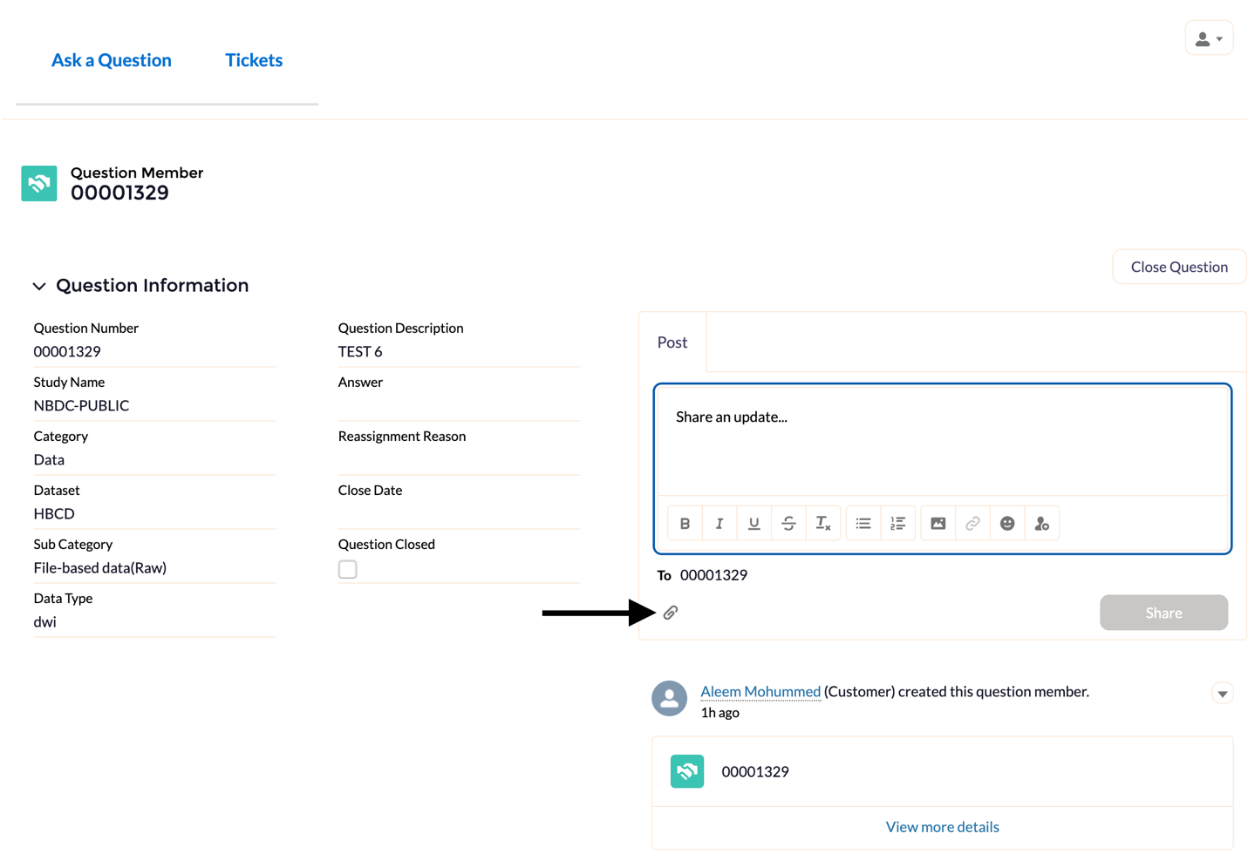
  1. Once you have added all your information, click on the “Share” button to submit your updates, changes, or responses to the SME. This will notify the necessary groups to review and answer your questions
Picture 917737099, Picture

How to use the Lasso Ticketing System as a Subject Matter Expert (SME)

Subject Matter Expert (SME) Routing and Assignment

  • Each ticket is routed based on category logic.
  • The primary SME listed for a given category will initially receive the ticket and may:
  • Respond directly
  • Reassign it to another SME with a relevant skill set
  • SMEs are filtered based on skill tags assigned to their profiles, so only qualified recipients are available for reassignment.
  • If an SME feels that a ticket assigned to them is outside their area of expertise, they can request it to be reassigned again through the platform.  

Manage Tickets: Portal Tabs

A screenshot of a computerAI-generated content may be incorrect., Picture

Within the Manage My Tickets section, users will see four distinct tabs:

A screenshot of a ticket formAI-generated content may be incorrect., Picture
  • Asking (Visible to users and SMEs)
    View, edit, and respond to tickets you have submitted. Note: Tickets seen on this screen are your tickets looking for answers from another SME or Lasso
  • Answering (Visible only to SMEs)
    View tickets assigned to you that are awaiting your response.
  • Closed (Visible to users and SMEs)
    Contains tickets that have been answered and acknowledged by either the requester or responder.
  • Reassign (Visible only to Primary SMEs)
  • Allows primary SMEs to assign a ticket to another qualified SME within their workgroup.
  • Only SMEs with the appropriate skill set will appear in the list.

Triage Workflow for Primary SMEs

  • One person per group acts as the primary or triage SME.
  • The Primary SME:
  • Sees all tickets assigned to their group
  • Can answer the ticket directly or reassign it
  • Can reassign to SMEs with the relevant skill set
  • Can track who the ticket has been reassigned to
  • SMEs only see tickets that require their response.

An email notification is automatically sent to users and SMEs when a ticket is assigned or updated with new information.  

To access a ticket directly from the email:

  1. Click on the “Link to Case” hyperlink  
Picture 865925831, Picture
  1. You will be prompted to log into the system and after logging in; click on the “Manage Tickets” button. Once clicked, you will be redirected to the ticket which requires your review.  
Picture 777033070, Picture
  1. Click on “Share an Update” to provide an answer to the question
Picture 738957825, Picture
  1. Enter your answer to the question in the text box which appears
Picture 2090796140, Picture

You can also add additional files or screenshots to your answers by clicking on the “Paper Clip” icon  

A screenshot of a computerAI-generated content may be incorrect., Picture
  1. Complete your answer by clicking on the “Share” button to notify the individual that a response has been provided

‍

Reassigning a ticket as an SME

  1. Go to the Help Center
    Navigate to the Manage My Tickets section and click on the "Reassign Tickets" tab.
  1. Reassign Within the Same Issue Category To reassign a ticket to another SME within the same issue category:
    • Locate the "Assigned To" column for the selected ticket.
    • Use the dropdown menu to choose the appropriate SME.
    • Click the Reassign to SME button.
Picture
  1. Change the Issue Category (if needed) If the issue category needs to be updated:
    • Go to the "Actions" column.
    • Select the appropriate category or option from the dropdown.
    • The system will automatically route the ticket to the correct SME based on the new category.
    NOTE:   If you're unsure where a ticket should be routed, simply click "Reassign to Lasso" and our team will review and direct it to the appropriate SME on your behalf.  
  1. Reassign the Ticket
    ‍
    Click "Reassign to SME" to complete the process.
    The selected SME will receive a notification, and the ticket will appear in their Answering tab.

    If the category appears to be incorrect or doesn't belong to your group, you can also click "Reassign to Lasso" and the ticket will be removed from your reassignment queue.  

Closing a Ticket as an SME

Once the researcher or individual has received their answer, you will need to close to ticket to remove it from your active list of questions.  

To close a ticket, follow these steps:

  1. Click on the “Close Question” button found on the top right-hand side of the ticket screen
Picture 2068909474, Picture
  1. A Pop-up will appear confirming that the question has been closed successfully
Picture 2034945451, Picture

Closing a ticket is important as it will move non-active tickets to the “Closed Tickets” tab. This will ensure that you are only able to see active tickets that require a response by you or your teams.  

‍

Lasso logo white horizontal
2025 Lasso Informatics Inc. All rights reserved.